- Always check brake fluid levels regularly and top off before it drops below the minimum mark to maintain safe braking performance.
- Use the correct type of brake fluid as specified in your vehicle’s manual; mixing incompatible fluids can damage your brake system.
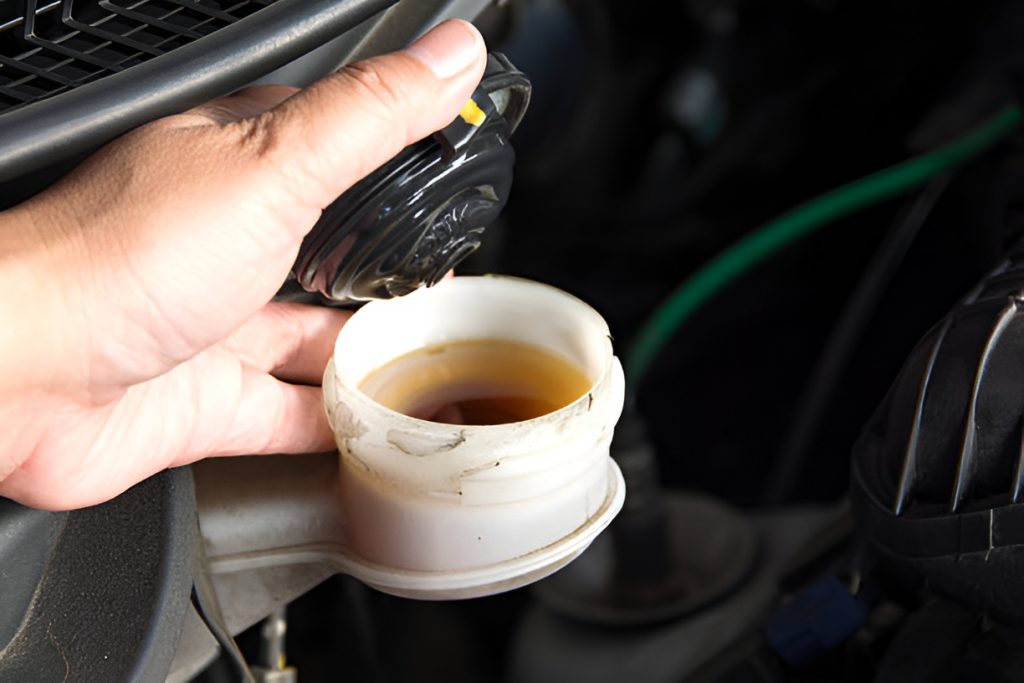
- Inspect the fluid’s color and condition—dark, cloudy, or contaminated fluid may require a full replacement rather than just topping off.
- Wear gloves and safety glasses, clean the reservoir area before opening, and avoid spills, as brake fluid is corrosive and can damage paint.
- Add fluid slowly using a funnel, fill just below the “MAX” line, check for leaks, and test your brakes after adding to ensure proper function.
- Consider a full brake fluid flush if the fluid is old, moisture-laden, or if braking performance is compromised, and seek professional help for persistent issues or system damage.
Brake fluid is one of those car maintenance essentials that often gets overlooked, yet it plays a vital role in keeping your vehicle safe and responsive. Without the right level and quality of brake fluid, your brakes can feel spongy, unresponsive, or even fail in critical situations. If you’re a beginner and unsure how to tackle this task, this guide will walk you through how to add brake fluid safely while giving tips, tricks, and explanations along the way.
Why Brake Fluid Matters: Do You Really Need to Add It?
Before diving into the how-to, it’s important to understand why brake fluid is crucial. Brake fluid transfers the force from your brake pedal to the brake calipers, which squeeze the brake pads against your rotors. Without proper fluid levels or with contaminated fluid, your braking performance can drop drastically.
Signs you might need to add brake fluid include:
- The brake warning light is on
- Spongy or soft brake pedal
- Leaks around the brake master cylinder
- Reduced braking efficiency
Adding brake fluid isn’t complicated, but doing it safely ensures you avoid accidents and protect your car’s braking system.
What You’ll Need to Add Brake Fluid
Having the right tools and materials makes the job much easier. Here’s a checklist:
- Correct type of brake fluid (DOT 3, DOT 4, or DOT 5 – check your owner’s manual)
- Clean cloths or paper towels
- Funnel with a long, narrow spout (optional but helps prevent spills)
- Latex or nitrile gloves to protect your hands
- Safety glasses
- Car jack and jack stands (optional, if needed for better access)
Always check your car manual for the recommended brake fluid type. Mixing fluids or using the wrong type can damage your braking system.
How to Check Your Brake Fluid Level
Before adding fluid, you need to know the current level. Most cars have a brake fluid reservoir near the back of the engine bay, usually a small translucent container with “MIN” and “MAX” markings.
- Park your car on a level surface and turn off the engine.
- Open the hood and locate the brake fluid reservoir.
- Check the fluid level against the markings. If it’s below “MIN,” it’s time to add more.
- Inspect the color: clean brake fluid is typically amber or light gold. Dark or dirty fluid indicates it may need a full replacement, not just topping off.
How to Add Brake Fluid Safely: Step-by-Step
Adding brake fluid is straightforward, but doing it correctly ensures your brakes remain responsive and your system stays protected.
Step 1: Prepare Your Work Area
- Park your car on a flat, level surface and engage the parking brake.
- Make sure the engine is cold before opening the hood.
- Wear gloves and safety glasses to protect your hands and eyes from the corrosive fluid.
Step 2: Locate and Clean the Reservoir
- The brake fluid reservoir is usually found at the back of the engine bay on the driver’s side.
- Wipe off any dirt or debris around the cap before opening it to prevent contamination.
- Carefully unscrew the cap; some caps may have sensors, so handle gently.
Step 3: Check Brake Fluid Level
- Make sure the fluid level falls between the “MIN” and “MAX” markings.
- If the fluid is below the minimum line, add more.
Step 4: Check Brake Fluid Condition
- Observe the color: healthy fluid is typically light amber or brown. Dark or black fluid necessitates a full replacement rather than just topping off.
- Consider the age of your fluid; over time, brake fluid absorbs moisture, which can reduce its boiling point and affect braking performance.
- Corrosion in the system can also degrade the fluid. Some tests, like moisture or copper content indicators, can reveal if your fluid is still effective.
Step 5: Add the Brake Fluid
- Using a clean funnel, pour the brake fluid slowly into the reservoir.
- Fill the reservoir until the level is between the ‘MIN’ and ‘MAX’ markings; overfilling can cause fluid to spill when the brakes heat up.
- Avoid touching the inside of the reservoir or introducing dirt.
Step 6: Inspect for Leaks
- Check the master cylinder and surrounding lines for leaks.
- If you find any leaks, do not drive the vehicle until they are repaired.
Step 7: Replace the Cap and Clean Up
- Securely screw the cap back on.
- Wipe up any spills immediately, as brake fluid can damage painted surfaces.
- Dispose of used cloths or paper towels safely.
Step 8: Test Your Brakes
- With the engine off, pump the brake pedal a few times to ensure pressure builds.
- Start the engine and test the brakes gently in a safe area.
- If the pedal feels spongy, air may have entered the lines, and the brakes may need to be bled.
How Often Should You Add or Change Brake Fluid?
Brake fluid doesn’t last forever. Over time, it absorbs moisture, which can lead to corrosion and reduced braking efficiency.
- Typical recommendation: check fluid every 6 months
- Replace every 2–3 years, or as specified in your vehicle’s manual
- High-performance or frequently driven cars may need more frequent changes
Regular checks prevent unexpected brake problems and keep your car operating safely.
What Happens If You Add the Wrong Type of Brake Fluid?
Using the wrong brake fluid can damage seals, hoses, and other braking components.
- DOT 3 and DOT 4 are glycol-based and generally compatible.
- DOT 5 is silicone-based and should not mix with DOT 3 or DOT 4.
- Always double-check your car manual before adding fluid.
Can You Add Brake Fluid Yourself or Should You Go to a Mechanic?

Adding brake fluid is considered beginner-friendly, but it requires care:
- Pros of DIY: Saves money, quick, and builds car maintenance confidence
- Cons: Spilling fluid can damage paint, overfilling can cause problems, and bleeding brakes may be necessary if air enters the lines
If you’re unsure, it’s safe to consult a mechanic. However, for topping off fluid, most beginners can manage with this guide.
Tips for Maintaining Your Brake Fluid
- Keep the reservoir capped tightly to prevent contamination
- Always use fresh, unopened brake fluid
- Clean the reservoir area before opening
- Check the fluid color regularly; amber is good, dark brown or black means replacement
Frequently Asked Questions
How Much Brake Fluid Should I Add?
Fill up to just below the “MAX” line. Overfilling can be as problematic as underfilling.
Can I Mix Different Brands of Brake Fluid?
Yes, if they are the same DOT type. Mixing different DOT types is not recommended.
What If My Brakes Still Feel Soft After Adding Fluid?
You may need to bleed the brake lines to remove trapped air. This step ensures the brakes respond correctly.
Is Brake Fluid Dangerous to Handle?
Brake fluid is toxic and corrosive. Always wear gloves, avoid skin contact, and clean spills immediately.
Can I Store Brake Fluid for a Long Time?
Unopened bottles store well for a few years. Once opened, moisture can contaminate the fluid, so use it within a few months.
Common Mistakes Beginners Make
- Overfilling the reservoir
- Using the wrong type of brake fluid
- Not cleaning the reservoir before opening
- Touching fluid with dirty hands
- Ignoring fluid color or contamination
Avoiding these mistakes will save you money and prevent brake system damage.
Signs It’s Time for a Full Brake Fluid Flush
While topping off is helpful, sometimes a full flush is necessary:
- Dark or cloudy brake fluid
- Corrosion in brake lines or calipers
- Brake pedal feels soft even after topping off
- Vehicle manufacturer recommends periodic flush
If you notice any of these signs, it might be time to learn how to change brake fluid instead of just adding more. A flush removes old fluid and contaminants, ensuring peak braking performance.
When to Seek Professional Help
Some issues require a mechanic’s expertise:
- Persistent leaks in the brake system
- Spongy brake pedal after topping off and bleeding
- Signs of brake line corrosion or damage
- ABS warning lights that don’t reset
Even if you handle topping off, professional checks every couple of years are a smart safety measure.
Wrapping Up
Knowing how to add brake fluid safely empowers you as a vehicle owner. It’s a straightforward task that can prevent serious problems, keep your brakes responsive, and extend the life of your braking system. By following this guide, using the right tools, and staying attentive to your vehicle’s needs, you’ll have confidence behind the wheel knowing your brakes are in top condition.
Remember: safety comes first. Always check your manual, use the recommended fluid, and never hesitate to consult a professional if something feels off. Regular maintenance now saves headaches, accidents, and costly repairs later.